
If you’re preparing for your driving test in Borehamwood, it’s essential to familiarise yourself with the specific roads and challenges that the area presents. From residential streets to busy junctions, knowing what to expect on your test route can significantly impact your performance. To help, we’ve compiled 20 in-depth FAQs about the Borehamwood Driving Test Routes, giving you all the insights you need to approach your test confidently.
Read More: Insider Tips on Borehamwood (London) Driving Test Routes
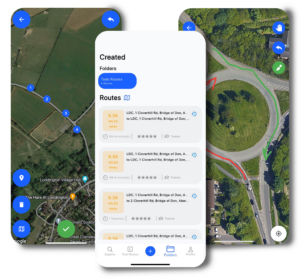

👉 Practise the Borehamwood Driving Test Routes with RouteBuddy!
20 Essential FAQs for Borehamwood Driving Test Routes:
1. Where is the Borehamwood Driving Test Centre?
📍 The Borehamwood Test Centre is located at Unit 1, Stirling Court, Stirling Way, Borehamwood, WD6 2BT. It is a central location that allows for easy access to various types of roads used in the test.
2. What types of roads will I encounter during the Borehamwood test?
Expect a variety of road types, including:
- Residential streets with narrow lanes and parked cars.
- Busy junctions and roundabouts.
- A-roads with faster-moving traffic.
- B-roads with sharp bends and uneven surfaces.
3. Are there any specific challenges in the Borehamwood area?
Yes, some challenges you’ll face include:
- Busy town centre roads with frequent pedestrian crossings.
- Narrow residential streets around Elstree Way and Theobald Street.
- Complex junctions, especially around Stirling Way and Theobald Street, require good observation and planning.
4. What’s the best way to prepare for the Borehamwood driving test?
It’s crucial to:
- Practice in the area: Familiarise yourself with local streets and traffic patterns.
- Use RouteBuddy to simulate real test conditions and routes, enhancing your confidence.
👉 Practise the Borehamwood Driving Test Routes with RouteBuddy!
5. What speed limits should I expect in Borehamwood?
- 30 mph in residential and town areas, including around Stirling Way.
- 40 mph on roads like Elstree Way and Theobald Street.
- 60 mph on nearby A-roads.
6. How important is lane discipline in Borehamwood?
Lane discipline is crucial, particularly when navigating roundabouts and multi-lane junctions. Be sure to signal well in advance and position your vehicle correctly for turns.
7. What are the most common manoeuvres tested in Borehamwood?
Expect to be tested on:
- Parallel parking: A common challenge in the town centre and residential streets.
- Emergency stop: Typically performed on quieter roads.
- Bay parking: Often required at locations like Elstree Studios or public car parks.
8. What kind of junctions will I encounter?
You’ll navigate a variety of junctions, including:
- T-junctions in residential areas.
- Roundabouts like the one at Theobald Street and Stirling Way.
- Traffic lights at busy crossings near Borehamwood High Street.
9. How do I handle roundabouts in Borehamwood Driving Test Routes?
When approaching roundabouts, always:
- Signal well before entering.
- Check your mirrors and position your car in the correct lane.
- Yield to traffic when necessary, especially when turning right.
10. What kind of weather should I be prepared for in Borehamwood?
Borehamwood can experience rain, fog, and wind, particularly in the winter months. Practising in varying weather conditions will help you stay calm and focused during your test.
11. Are there any pedestrian crossings in Borehamwood Driving Test Routes?
Yes, you’ll encounter zebra crossings and pelican crossings in residential and town areas. Always be aware of pedestrians, especially in areas like Borehamwood High Street.
12. How long does the Borehamwood driving test last?
The driving test typically lasts around 40 minutes, covering a variety of roads, including town streets, residential areas, and A-roads.
13. How should I deal with parked cars during my test?
Be prepared to:
- Pass parked cars carefully, especially on narrow residential streets.
- Adjust your speed and positioning to ensure safety when driving past parked cars.
14. Are there any specific areas where I should focus on my observation skills?
Yes, particularly when:
- Approaching junctions, especially where visibility is reduced.
- Navigating narrow residential streets with parked cars.
- Turning left or right onto busier roads like Theobald Street.
15. Can I practice the exact Borehamwood driving test routes before my test?
Yes, you can practise the exact Borehamwood Driving Test Routes with RouteBuddy. This allows you to familiarise yourself with the specific roads and challenges you’ll face during the test.
👉 Practise the Borehamwood Driving Test Routes with RouteBuddy!
16. What are the most common mistakes made on the Borehamwood route?
- Failing to check blind spots when merging into traffic.
- Hesitating at junctions, especially when turning onto busy roads.
- Not using passing places correctly on narrow streets.
17. What documents do I need to bring to the test?
Make sure to bring:
- Your provisional driving licence.
- The theory test pass certificate.
Any required glasses or contact lenses for vision.
18. Is there any specific advice for driving on the A-roads in the Borehamwood Driving Test Routes?
- Ensure you maintain an appropriate speed for the road conditions.
- Keep a safe distance from vehicles, especially on Theobald Street and Elstree Way, where traffic can be heavy.
19. What happens after the test?
🎉 Pass: Apply for your full driving licence online and celebrate your success!
📋 Fail: Review the examiner’s feedback and focus on the areas you need to improve. Practise with RouteBuddy to address any weak points.
20. Where can I find more information about Borehamwood driving test routes?
For more detailed routes, RouteBuddy offers comprehensive GPX-guided routes to help you practice the Borehamwood Driving Test Routes. Ensure you’re fully prepared with realistic practice sessions.
Sample Guide of the Borehamwood Driving Test Routes:
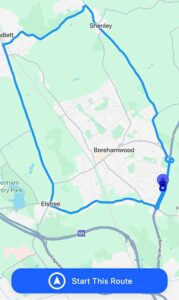
Starting at Borehamwood Test Centre
Location: Unit 1, Stirling Court, Stirling Way, Borehamwood, WD6 2BT.
Directions: Exit the test centre and turn onto Stirling Way, heading towards the A411.
First Section – A411 Toward Watling Street
Lane: Stay in the left lane as you approach the A411.
Speed limit: 30 mph.
Landmarks: Passing near the Borehamwood town centre and close to local shops.
Tip: Be mindful of pedestrians and cyclists, as this area experiences high foot traffic.
Turn Right onto Watling Street (A5183)
Lane: Stay in the left lane to merge onto Watling Street.
Speed limit: 40 mph.
Landmarks: Passing by Elstree Way and the Elstree Studios.
Tip: Be prepared for a mix of traffic—watch for buses and larger vehicles at the junction.
Turn Left onto Radlett Lane
Lane: Keep in the left lane for Radlett Lane.
Speed limit: 30 mph.
Landmarks: Passing residential areas with narrow lanes and parked cars.
Tip: Be vigilant for pedestrians and check your blind spots thoroughly when passing parked vehicles.
Turn Right onto London Road (A5183)
Lane: Stay in the right lane for London Road.
Speed limit: 40 mph.
Landmarks: Passing Borehamwood High Street, a busy shopping area.
Tip: This area can get crowded, so ensure to signal well ahead when changing lanes or turning.
Continue on London Road to Well End Road
Lane: Stay in the appropriate lane for Well End Road.
Speed limit: 30 mph.
Landmarks: Passing through residential areas.
Tip: Be aware of cyclists and other road users.
Turn onto Rowley Lane
Lane: Keep in the left lane for Rowley Lane.
Speed limit: 30 mph.
Landmarks: Passing through quieter residential areas.
Tip: When navigating narrow roads and parking areas, ensure careful observation.
A5135 Roundabout
Lane: Position yourself in the correct lane for your exit.
Speed limit: 30 mph on the roundabout.
Landmarks: A5135 roundabout is located near key junctions leading to the A1.
Tip: Be cautious of other traffic, as this is a busy roundabout. Ensure you signal and give way appropriately.
Turn onto A1 (Barnet Bypass)
Lane: Keep to the left lane when merging onto the A1.
Speed limit: 60 mph.
Landmarks: Heading towards the outskirts of Borehamwood.
Tip: The A1 is a major road, so keep a safe distance from other vehicles and be ready for higher-speed traffic.
Stirling Corner Roundabout
Lane: Position yourself in the correct lane for your exit to Sterling Way.
Speed limit: 30 mph on the roundabout.
Landmarks: Stirling Corner is a major roundabout leading into the Borehamwood area.
Tip: Watch for traffic signals at the entry points to the roundabout and ensure your vehicle is positioned properly to avoid confusion with multi-lane traffic.
Return to Stirling Way
Lane: Follow the road back to Sterling Way and head back toward the test centre.
Speed limit: 30 mph, dropping to 20 mph near the test centre.
Tip: The return to the test centre may require a bay park or reverse manoeuvre. Set up early and remember to straighten your wheels when finishing the manoeuvre.
Conclusion: Ready to Conquer the Borehamwood Driving Test Routes?
The Borehamwood Driving Test Route offers a mix of challenges, from busy junctions to narrow residential streets. However, with proper preparation, including practising the exact routes using RouteBuddy, you can approach the test with confidence.
Start preparing today and make sure you’re ready for your Borehamwood driving test.
![]()
👉 Practise the Borehamwood Driving Test Routes with RouteBuddy!